
The Avid Seamstress Blouse review
- MingMakes
- May 23, 2024
- 6 min read

Along with many other patterns, The Blouse by The Avid Seamstress was on my list to sew at some point. I liked the collar and it seemed like a wardrobe basic that I could sew up several versions of in different fabrics. I really like how button-up blouses look tucked into trousers/jeans, and when I saw that there was an opportunity to make this on a retreat, I went for it.

Creative Spirit Retreat
When booking up for The Creative Spirit Retreat, I knew it will be something special but even so it exceeded my expectations. Although I have attended many workshops and stayed over in local accommodation, I had only been to one other retreat before. The accommodation was beautiful, and there was plenty of room in the workshop, with expert instruction from the founder Lisa Falconer and sewing tutor Amanda.

What appealed to me about this was how it was described as a holistic retreat, not just about the sewing, great instruction, and learning techniques but also a place where you could relax body, mind and recharge. The fact that meditation and massage was included was a big plus. All meals were provided and were delicious.


There were seven of us sewing Lisa's patterns including The Blouse, Raglan Dress, Sun Dress, Blazer and Coat. I choose The Blouse which was the first Avid Seamstress pattern I have sewn. None of us knew each other before, but we bonded well over the relatively short space of time we spent together. The weekend retreat started late afternoon on a Friday and ended when we checked out on Monday morning. Despite it only being two full days it felt much longer. Here we are wearing what we had made.

As someone who generally doesn't finish the garment within the workshop time, I was mindful of trying not to hurry myself, because the whole point of this retreat was to enjoy the process. During the day I took advantage of the pool and sauna on site, leisurely enjoyed the lovely lunches, spent time chatting with the others, and I did still manage to finish the blouse. The evenings were equally relaxed with some wonderful group activities.

A great indication of how much I immersed myself into the retreat was realising that my mobile phone battery level was still 48% when I left, without having charged it at all while I was there.

Fit
For this particular pattern, Lisa had samples made up in different sizes and had offered to send me the size I had selected from the chart which was size 2. This was really useful as a starting point, meaning one less toile. It had one sleeve with the elasticated cuff and one without so I could see which I preferred.

I found the sample was a little tight and so sized up to size 3, along with upper and lower rounded back and sleeve adjustments. See my separate post here on my detailed fitting journey, with photos of my toiles.

I shortened the blouse by 10cm but after wearing it realised it has a tendency to come untucked again, so I would add a few cm back to the hem.
Fabric
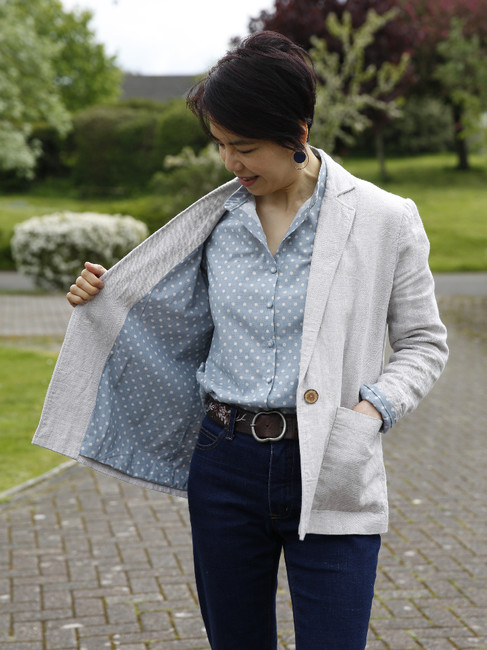
I used a light blue polka dot cotton purchased while on holiday in Malaysia. It was left over from lining my Heather Blazer; here's my matchy matchy look styled with my Ginger Jeans.


Construction
Instructions
What I really appreciated in the pattern instructions was Lisa's clear attention to detail. She explains everything as if you wanted to achieve the best result, rather than simplicity for a quick or easy project. That's not to say that the instructions are complicated in any way, it's just that she emphasises where it's really important to be precise. This is brilliant for someone like me at my level of experience, where I can't always anticipate where a small discrepancy may cause an issue further down the line.

I often find my second version of a garment is better because I've figured out where things could have been improved only with hindsight. With this blouse, I can't say there was anything I'd be more careful with or do differently thanks to the great instructions, as well as in-person guidance.
Overlocking
I am not in the habit of overlocking pattern pieces before constructing them, but this was the technique recommended by Lisa. She helpfully details in the instructions which edges of the pieces need to be overlocked.
This allowed for pressing the seam allowances open for a neat and less bulky result, and I can see how it would be useful for a fabric prone to fraying.

Sleeves
As mentioned in my fitting post, I had adjusted the sleeves in a way that I wasn't sure where the notches should be. I therefore gathered the sleeve by eye, concentrating more of the gathering around the sleeve cap and this seemed to work OK.

Collar
The collar is fairly narrow so Lisa gave the option to widen it which I preferred. Having already cut this piece out, she advised simply making the seam allowance 6mm instead of 1cm on the outer curve (not where it attaches to the neckline). She also advised erring on the slightly smaller side if anything for the seam allowance where it attaches to the neckline, so to aim for 9-10mm, rather than 10-11m.

Buttonholes
This is always the nerve-wracking bit towards the end, but thankfully my machine and buttonhole foot behaved themselves. Since this was my first time with this pattern, Lisa advised not sewing the buttonhole on the collar if I wasn't going to use it. I was more than happy to go with this advice!

Buttons
The pattern calls for 9mm buttons which were a little tricky to find. Lisa suggested looking at those by Atelier Brunette. Several of the ones I thought would match best were sold out in 9mm, so I ended up buying the off-white ones in 10mm, and silver self-cover buttons in 9mm as a back up shown in the photo below.

The off-white buttons didn't quite look right and so I went with the self-cover ones, spending some time getting a white dot in the centre of each button. This was my first time with self-cover buttons, and I found it quite a satisfying process. After cutting a circle of fabric, you wrap it around the button and I used tweezers to grip it under the teeth on the underside. I then pressed the back part on until there was a click. With the slippery surface of the button, I used my Sewline fabric glue pen to hold it in the right position while attaching the back.

Lisa advised sewing one button on, doing it up, then marking and sewing the next button and so on, rather than marking them all first. This worked well and everything matched up nicely.

Summary


See the end of my fitting post here to see how the finished blouse looks untucked.
What I love
The clear and detailed instructions with explanation of when precision was particularly important.
The mandarin collar looks great and avoids the bulkiness of lapels on more traditional shirt-style blouses.
I love how it looks when tucked into trousers, it has just the right amount of ease for a slight blouson effect.

What I would change
Adjustments as mentioned in my separate fitting post here.
I would consider adding a cuff to the sleeve hem instead of elastic.
I would like to try this in a more drapey fabric such as viscose or silk to give a more relaxed look to the collar.
What I discovered
Getting guidance and advice from the pattern designer herself makes for a really accurate garment.
This retreat very much reinforced the notion that self-care is so important, and sewing is definitely a part of that but it works both ways. In order to fully enjoy the activity of sewing, it helps to have other parts in place such as physical and emotional wellbeing, restorative sleep, good nutrition, enabling me to get the most out of sewing. This long weekend showed what an impact a bit of care and attention for myself can have and while I cannot replicate this experience at home, I can help create a sewing lifestyle that nourishes my soul.
Find me on Instagram, Facebook, YouTube, Bloglovin' or scroll to the bottom to subscribe to my newsletter which is published every month.
Links
I have no affiliations, I'm just a keen buyer and user. A UK supplier may be linked, please try to source items from your favourite independent stores.


This was such a great read! The retreat sounds like an amazing experience, and the level of detail in making the blouse fit perfectly is so impressive. It’s kind of like following ผลบอลสด—every little adjustment and strategy can make a big difference in the final outcome! 🧵✨ Now I’m tempted to try sewing my own blouse too!
Thank you for taking the time to write this review and your honest approach to each element. Your approach to sewing is our favourite; considered and taking your time with each step. I absolutely loved your company and the positive and friendly vibe that is you. Your garment is stunning and those polka dot placement on the covered buttons is just lush! xxx Lisa, The Avid Seamstress